

Sign in with Flowsta
Add "Sign in with Flowsta" to your application and let users sign in with their Flowsta account.
Sign in with Flowsta works like "Login with Google" or "Sign in with Apple" from your side of the integration: standard OAuth 2.0 with PKCE, a pre-built button, and a /oauth/userinfo endpoint. The difference is what happens on Flowsta's side - there is no one in between. A Flowsta account lives on the user's own device, secured by a 24-word recovery phrase and the Flowsta Vault app. The user approves every sign-in with keys only they hold.
How Flowsta Accounts Work
- Device-hosted identity - the user's identity is a keypair on their device, backed by a 24-word recovery phrase. Flowsta never holds the keys.
- No passwords - there is no password login. When a user signs in on
login.flowsta.com, their Flowsta Vault signs a one-time challenge to prove they hold their keys. - Standard OAuth for you - your app never touches any of this. You implement ordinary OAuth 2.0 Authorization Code + PKCE; Flowsta handles the Vault interaction on its login page.
Why Sign in with Flowsta?
For Your Users
- One account, everywhere - sign in across all Flowsta partner sites
- Keys only they hold - no password to phish, no credential database to breach
- Every sign-in approved - the user's own Vault signs each login challenge
- W3C DIDs - self-sovereign, portable identity
For Developers
- Quick integration - add a button, configure OAuth, done
- Standard OAuth 2.0 - industry-standard protocol with PKCE
- Multiple frameworks - React, Vue, Qwik, Vanilla JS support
- Beautiful UI - pre-built login buttons and hosted auth pages
- Free tier - get started without a credit card
How It Works
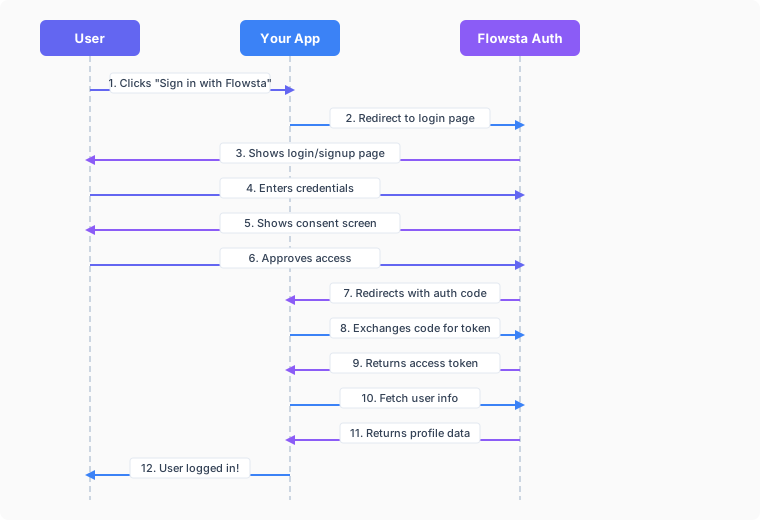
OAuth 2.0 Flow
Sign in with Flowsta implements the OAuth 2.0 Authorization Code Flow with PKCE:
- User clicks "Sign in with Flowsta" button
- Your app redirects to
login.flowsta.com(a full-page redirect) - User approves the sign-in with their Flowsta Vault (or creates an account)
- User grants consent for the scopes you requested
- Flowsta redirects back to your redirect URI with an authorization code
- Your app exchanges the code for an access token
- Your app fetches user profile data from
/oauth/userinfo - User is logged in to your application
Features
Security
- OAuth 2.0 with PKCE - protection against authorization code interception
- Refresh tokens - long-lived sessions (30 days)
- Token revocation - instant logout
- Rate limiting - protection against abuse
- Audit logging - full security tracking
Email Stays With the User
Flowsta accounts are device-hosted, and the server keeps only a hash of the user's email - Flowsta has no email database to hand out.
- The
emailscope means asking the user to share their address: at the consent screen, the user explicitly provides the email to share (pre-filled from their Vault when available), and Flowsta verifies it against the account's hash before accepting it. - Once shared,
/oauth/userinforeturnsemailandemail_verifiedfor your app only. Only verified addresses can be shared, so the claim is trustworthy. - The shared copy is held per-app for delivery and deleted when the user revokes your app from their dashboard - design for the possibility that it goes away.
Customization
- Pre-built buttons - responsive designs (light/dark/neutral)
- Hosted pages - professional login and consent screens
- App branding - add your logo, privacy policy, terms
- Custom scopes - request only what you need
Available Scopes
Flowsta uses granular scopes so users only consent to the specific data your app needs:
| Scope | Description | User Data |
|---|---|---|
openid | User identifier (auto-included) | sub (stable user UUID) |
display_name | Display name | name |
username | Username | preferred_username |
email | Email address | email, email_verified - only after the user explicitly shares it at consent (verified addresses only; revocable) |
profile_picture | Profile picture | profile_picture, has_custom_picture |
did | Decentralized ID | did (W3C DID) |
public_key | Public key | agent_pub_key (Holochain) |
holochain | Holochain identity access | agent_pub_key in /userinfo |
sign | Sign It signing | Gates Sign It signing endpoints (no extra /userinfo fields) |
verify | Sign It verification | Gates Sign It verification endpoints (no extra /userinfo fields) |
Request Only What You Need
Instead of requesting all profile data, choose only the scopes your app actually needs. This builds user trust and simplifies the consent screen.
Email Is a Gift, Not a Given
The email scope asks the user to share their address at the consent screen - they can decline by denying, and they can revoke it later (which deletes Flowsta's shared copy). Design your app to work without an email, and treat one you receive as revocable.
Quick Start
Get Sign in with Flowsta running in 5 minutes:
1. Create a Flowsta Developer Account
- Go to dev.flowsta.com
- Sign up or log in
- Create a new application
2. Configure OAuth Settings
In your app's dashboard:
Add redirect URIs (where users return after login)
https://yourapp.com/auth/callbackSelect scopes your app needs
openid(auto-included, returns user ID)display_name,username,profile_picture(profile data)did,public_key(technical identifiers)
Add branding (optional)
- Logo URL
- Privacy Policy URL
- Terms of Service URL
3. Install the Button Widget
npm install @flowsta/login-button4. Add the Button
The button performs a full-page redirect to login.flowsta.com. There is no success callback in your app - the authorization code arrives at your redirect URI on a fresh page load, and you handle it there (step 5).
import { FlowstaLoginButton } from '@flowsta/login-button/react';

function App() {
  return (
    <FlowstaLoginButton
      clientId="your_client_id"
      redirectUri="https://yourapp.com/auth/callback"
      scopes={['openid', 'display_name']}
      variant="dark-pill"
      onError={(error) => console.error('Could not start login:', error)}
    />
  );
}<script setup>
import { FlowstaLoginButton } from '@flowsta/login-button/vue';
const handleError = (error) => {
console.error('Could not start login:', error);
};
</script>
<template>
<FlowstaLoginButton
client-id="your_client_id"
redirect-uri="https://yourapp.com/auth/callback"
:scopes="['openid', 'display_name']"
variant="dark-pill"
@error="handleError"
/>
</template>import { FlowstaLoginButton } from '@flowsta/login-button/qwik';
import { $, component$ } from '@builder.io/qwik';
export default component$(() => {
const handleError = $((error: any) => {
console.error('Could not start login:', error);
});
return (
<FlowstaLoginButton
clientId="your_client_id"
redirectUri="https://yourapp.com/auth/callback"
scopes={['openid', 'display_name']}
variant="dark-pill"
onError$={handleError}
/>
);
});<div id="flowsta-login"></div>
<script type="module">
import { initFlowstaLoginButton } from '@flowsta/login-button/vanilla';
initFlowstaLoginButton('#flowsta-login', {
clientId: 'your_client_id',
redirectUri: 'https://yourapp.com/auth/callback',
scopes: ['openid', 'display_name'],
variant: 'dark-pill',
onError: (error) => console.error('Could not start login:', error),
});
</script>5. Handle the Callback
After the user approves the sign-in, Flowsta redirects to your redirect URI with ?code=...&state=.... On that page, validate the state, retrieve the PKCE verifier the button stored, and exchange the code for tokens:
// On your redirect URI page (e.g. /auth/callback)
import {
  handleCallback,
  validateState,
  retrieveCodeVerifier,
} from '@flowsta/login-button';

const { code, state, error, errorDescription } = handleCallback();

if (error) throw new Error(errorDescription || error);
if (!state || !validateState(state)) throw new Error('State mismatch');

const codeVerifier = retrieveCodeVerifier(state);

// Exchange code for tokens (PKCE - no client secret needed!)
const response = await fetch('https://auth-api.flowsta.com/oauth/token', {
  method: 'POST',
  headers: {
    'Content-Type': 'application/json',
  },
  body: JSON.stringify({
    grant_type: 'authorization_code',
    code,
    redirect_uri: 'https://yourapp.com/auth/callback',
    client_id: 'your_client_id',
    code_verifier: codeVerifier,
  }),
});

const { access_token, refresh_token } = await response.json();No Client Secret Required
With PKCE, you don't need a client secret for browser or mobile apps. The code_verifier proves you initiated the request.
6. Fetch User Data
const userResponse = await fetch('https://auth-api.flowsta.com/oauth/userinfo', {
  headers: {
    'Authorization': `Bearer ${access_token}`,
  },
});

const user = await userResponse.json();
// { sub, name, preferred_username, did, agent_pub_key, profile_picture, has_custom_picture }
// Note: no email - device-hosted accounts never return one.That's it! Your users can now sign in with Flowsta.
Next Steps
- Quickstart Guide - Detailed step-by-step tutorial
- Button Widget - Customize the login button
- API Reference - Complete OAuth endpoints
- Security - Best practices and security guide
- Holochain Integration - Sign Holochain actions with Flowsta
Need Help?
- 💬 Discord: Join our community
- 🆘 Support: Find out about Flowsta support options
- 🐙 GitHub: github.com/WeAreFlowsta